Sunday, 12 June 2016

Recording Contra Entry in Double Entry Mode in Tally ERP 9

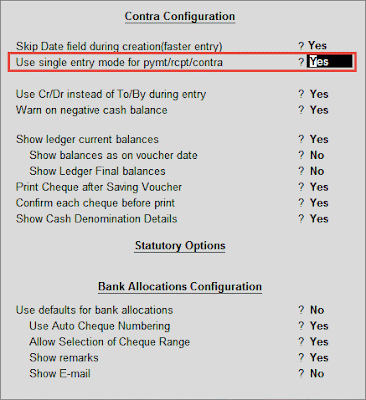
The Contra voucher can be recorded using Double Entry mode where we have the option to select multiple Debits and multiple Credits. To select multiple Debit and Credit ledgers in the Double entry mode, set Use Single Entry Mode for Payment/Receipt/Contra to No in F12: Configure.
Refer to F12: Configuration in Tally.ERP 9 for more details.

Entering in Double Entry Mode

Go to Gateway of Tally > Accounting Vouchers
  • Select F4: Contra from the Button Bar or press F4.
If you record the same entry (passed in single entry mode) in Double Entry Mode, it will be displayed as shown:
Similar to the Contra entry in Single Entry Mode,
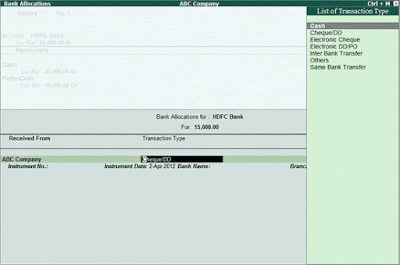
In the Bank Allocation screen, users can select the mode of transaction from the List of Transaction Type as shown:
By default, Cheque/DD will be selected.
When Cash is selected as the Transaction Type, a new screen – Cash Denominations
The cash denominations entered here will be captured in the Cash Denomination details while printing a Cash Deposit Slip for this transaction.
The Difference field will give the difference between the total and and the sum of amounts specified for the Denominations.

Note: If the cash is transferred to more than one bank, then for each bank a separate Cash Denominations screen will appear.


read more "Recording Contra Entry in Double Entry Mode in Tally ERP 9"

Recording Contra Entry in Single Entry Mode in Tally.ERP 9

The Contra Voucher can be recorded using Single entry mode or Double Entry mode.  To toggle between Single Entry and Double Entry mode, we need to change the setting Use Single Entry mode for Pymt/Rcpt/Contra to Yes/No in F12: Configure.
To view Contra Voucher creation screen in Single Entry mode:
Go to Gateway of Tally > Accounting Vouchers > Select F4: Contra
For example, to transfer funds from Cash Account to Bank Account:
  1. Debit the Bank Account
  2. Credit the Cash Account
The entry will be displayed as shown.
In the Bank Allocation screen, users can select the mode of transaction from the List of Transaction Type as shown:

By default, Cheque/DD will be selected.
When Cash is selected as a Transaction Type, user can specify the cash denominations for the transaction in the voucher entry screen, if the optionShow Cash Denomination Details set to Yes in F12: Configuration (By default, this option is enabled)
During Bank Allocation, a new screen – Cash Denominations will appear for Cash Transaction Type.


The cash denominations entered here will be captured in the Cash Denomination details while printing a Cash Deposit Slip for this transaction.
The Difference field will give the difference between the total and the sum of amounts specified for the Denominations.

Advantages of Single Entry Mode:

  • Faster data entry.
  • When there is a Single Debit and Multiple Credits in the entry.


read more "Recording Contra Entry in Single Entry Mode in Tally.ERP 9"

Introduction to Contra Voucher in Tally ERP 9

As per the Accounting Principles, a Contra entry is a transaction involving transfer of cash between one Cash A/c to another or one Cash A/c to another Bank A/c i.e., is a transaction indicating transfer of funds from:
  • Cash account to Cash account
  • Cash account to Bank account
  • Bank account to Cash account
  • Bank account to Bank account
To view the Contra Voucher Entry Screen:
Go to Gateway of Tally > Accounting Vouchers
  • Select F4: Contra from the Button Bar or press F4
read more "Introduction to Contra Voucher in Tally ERP 9"

Voucher Entry Creation Screen

The Voucher Entry screen is divided into three parts:  
  • The Main Voucher Entry  
  • Vertical Button Bar
  • Calculator

Voucher Entry Screen components

Main Voucher Entry Area

The Main Voucher Entry Area is where you enter all your transactions. This area has fields for Date, Ledger Name and Amount as well as additional pop-up screens that are dependent on your voucher configuration and the nature of transaction you make.

Button Bar

The Button Bar area displays buttons that provide quick links to various functions and features of Tally.ERP 9. Buttons that are relevant to the current task are enabled and the other buttons are disabled.

Switching between Screen Areas

The Main Voucher Entry Area is the active area by default on the Voucher Creation screen. Press Ctrl+N to navigate to the Calculator Area and press Ctrl+M to toggle back to Main Voucher Entry Area.  A green bar highlights the active area of the screen.

Calculator Area

The Calculator area provides a working space where you can enter any number of mathematical formulae for complex calculations.
Note: Press Alt+C to use calculator when at amount field.

Special Keys for Voucher Narration Field

ALT+R: Recalls the Last narration saved for the first ledger in the voucher, irrespective of the voucher type.
CTRL+R: Recalls the Last narration saved for a specific voucher type, irrespective of the ledger.

Checking the accuracy of the vouchers

To check the accuracy of the vouchers that you have entered:
Go to Gateway of Tally > Display > Day Book
  1. Select F2: Period from Button Bar and enter the period for which you want to view Vouchers.
Note: It defaults to the current date only but you may display all the transactions for a particular period.
Select F1: Detailed
You can check the vouchers for correctness. To correct a mistake, position the cursor on the item where you have found the error and press Enter. Tally.ERP 9 displays the voucher details for alteration. The alteration facility is subject to security and access rights. All alterations are available for audit.
read more "Voucher Entry Creation Screen"

Predefined Vouchers in Tally.ERP 9

Tally comprises of the following predefined Vouchers, to suit different business requirements for recording various transactions. Tally also allows you to create user-defined Vouchers (Voucher Types) as per your requirements.
  • Contra Voucher
  • Payment Voucher
  • Receipt Voucher
  • Journal voucher
  • Sales Voucher / Invoice
  • Debit Note Voucher
  • Credit Note Voucher
  • Purchase Voucher / Invoice
read more "Predefined Vouchers in Tally.ERP 9"

Thursday, 10 March 2016

F12: Voucher Entry Configuration in Tally ERP9

his option allows you to configure the vouchers entries in Tally.ERP 9, both the Accounting and Inventory Vouchers can be configured from this menu for additional information.
Go to Gateway of Tally > F12: Configure > Voucher Entry
By default, the above configuration options are displayed in the Voucher Entry Configuration screen, which can be changed as per requirements.
Note: Depending upon the Company Features, options get added in Voucher Entry configuration. For instance, if you enable Allow Multi Currency option in F11 : Accounting FeaturesShow Forex Gain/Loss as on Voucher Date option gets added in voucher entry configuration.

Accounting Vouchers

Skip Date field during Creation (faster entry)

By default, the Cursor skips the Date field during Voucher creation. If you do not want to skip the date field then set this option to No

Use single entry mode for pymt/rcpt/contra

By default, Tally.ERP 9 displays single entry mode for payment/receipt/contra entry. If you want to display it in double entry mode, then set this option to No

Use payment / receipt as contra

By enabling this option, you can enter contra in payment as well as receipt voucher

Use Cr/Dr instead of To/By during entry

By enabling this option, you can change To/By to Cr/Dr in the Voucher Entry screen

Use cheque printing for contra

By enabling this option, you can print the Cheques from Contra Voucher itself while making the inter bank transfers and Cash withdrawals. The  Cheque printing option will appear the for the Bank which is Credited

Warn on negative cash balance

By Default, Tally.ERP 9 displays a Negative Cash balance warning Message. If you set it to No, this error message will not be displayed

Pre-allocate bills for payment/receipt

By enabling this option, you can pre-allocate the bills before specifying the Ledger amount

Allow cash accounts in journals

By enabling this option, you can select cash and also bank account in Journal

Allow expenses / fixed assets in purchase voucher

By enabling this option, you can select the expenses and also Fixed Asset ledger in Purchase Voucher Entry

Allow income accounts in sales voucher

By enabling this option, you can select the income ledger in sales voucher entry

Show inventory details

By default, Tally.ERP 9 displays inventory details in the voucher entry screen. If you set it to No, the inventory details will not be displayed

Show table of bill details for selection

By default, Tally.ERP 9 displays Pending Bills list of a ledger account in the voucher entry screen. If you set it to No, the pending bills list will not be displayed

Show bill-wise details

By default, Bill-wise details of a ledger account are displayed in the Voucher entry screen. If you set it to No, Bill wise details will not be displayed

Expand into multiple lines

This is a sub-option of the Show bill-wise Details option. When you enter credit days in the Bill-wise Details screen, Tally.ERP 9 displays the due date below the credit days. By default, it displays both credit days and Due date in the voucher entry screen. If you set it to No, it will display only credit days

Show ledger current balance

By default, Tally.ERP 9 displays the ledger current balance up to last voucher entry date. If you set it to No, the ledger current balance will not be displayed

Show balance as on voucher date

By default, Tally.ERP 9 displays the ledger current balance up to Last voucher entry date. If you set it to Yes, it will display the ledger balance up to current voucher entry date
Show forex gain/loss as on voucher Date
By default, Tally.ERP 9 displays the Forex Gain/Loss balance up to the Last voucher entry date. If you set it to Yes, it will display the Forex Gain/Loss balance up to current voucher entry date

Inventory Vouchers

Use reference number in stock journal

By enabling this option, you can add the voucher reference field in Stock Journal also

Show compound unit of item based on rate

By enabling this option, you will be allowed to show the compound unit of item based on the unit provided in the Rate Per column.
Example: Compound Unit created as Kgs of 1000 grms. When the Quantity is typed as 12-250, the Quantity will be displayed as 12-250 kgs and unit in Rate per as Kgs. Enable the optionShow Compound Unit of Item based on Rate, and type the required Unit in Rate Per column to change the compound unit of the Item, i.e., if grms is typed in Rate Per column, theQuantity will automatically change to 12,250 grms.

Show full details of compound unit

Enabling this option will display full details of compound unit in the Quantity field. If Kgs is typed in Rate Per field, the Quantity field will display as 12 Kgs.250 grms.

Warn on negative stock balance

By default, Tally.ERP 9 displays a warning message for negative stock balance. If you set it to No, the error message will not be displayed.

Honor Expiry Dates usage for Batches

By default, Tally.ERP 9 displays expiry batches in the List of Active batches during Voucher Entry. If you set it to No, expiry batches will not be displayed in the List of Active batches.

Show balances as on voucher date

By default, Tally.ERP 9 displays the Stock Item balance up to the Last voucher entry date. If you set it to Yes, it will display the Stock Item balance up to current voucher entry date.

Show Godown-wise details

This option is used only in the case of Rejection in and Rejection out vouchers. By default, Tally.ERP 9 displays the Godown details in Rejection in/out vouchers. If you set it to No, the godown details will not be displayed in Rejection in/out vouchers.

Show batch-wise details

This option is used to display batch information pertaining to Stock Items during Voucher Entry. If you set it to No, the Batch-Wise details will not be displayed.
read more "F12: Voucher Entry Configuration in Tally ERP9"

F12: Accts / Inventory Info. Configuration in Tally ERP9

Here you can configure the details you want in the masters over and above those provided by fault. You can access the F12: Configure screen from Accounts Masters and Inventory Masters when required. The fields pertaining to both Accounting and Inventory Info. can be configured here.
Go to Gateway of Tally > F12: Configure > Accts/Inventory Info.
Note: Depending upon the Company Features, option gets added in the Master configuration. For instance, if you enable VAT in F11 Statutory Feature, then the optionCalculate VAT on MRP/Marginal gets added.

Master Configuration

Allow aliases along with names

Set this option to Yes to enter the Alias names in the Master.

Allow language aliases along with names

Set this option to Yes to enter the Alias names in any of the Indic Languages in the Master.

Accounts Masters

Allow advanced entries in masters

Set this option to Yes, to enter some of the advanced information in the Ledger and Group Master. This information will be reflected in the reports.

Use addresses for ledger accounts

Set this option to Yes to enter the Mailing Details in the ledger master. It is useful for  Customer ledgers, Party ledgers or Bank AccountsMailing Details like NameAddressStatePIN Code and PAN / IT No. is entered in this section.
These details will appear in the printed reports.

Use contact details

Set this option to Yes to specify the details of Contact person (if any) in the ledger creation screen.
You can specify the details like the Name of the Contact PersonTelephone NumberFax Number and the E-Mail Id.

Add notes for ledger accounts

Set this option to Yes and a new field to enter Notes appears in the Ledger master. This field allows you to enter any additional information about the ledger.
Note: The Contact Details for the ledgers appear only if Use Addresses for Ledger Accounts is set to Yes.

Add description for ledger accounts

Set this option to Yes to enter additional description for ledgers. The field Description will be available in the Ledger Creation/ Alteration screen, where the description can be recorded.

During voucher entry, the description entered in the ledger will be captured. This can be modified in the Description(s) for Ledger screen.

Inventory Masters

Allow advanced entries in masters

Set this option to Yes to specify the behaviour of the Stock Item, in the Stock Item Master. For further details, please refer the section Stock Items.

Use part numbers for stock items

Set this option to Yes, to enter the Part Numbers of the Stock Item.

Use description for stock items

Set this option to Yes to enter additional description for ledgers. The field Description will be available in the Stock Item Creation/ Alteration screen, where the description can be recorded.

During voucher entry, the description entered in the ledger will be captured. This can be modified in the Description(s) for Item screen.

Use remarks for stock items

Set this option to Yes to enter your remarks or comments about the stock Item.

Use alternate units for stock items

Set this option to Yes to define an Alternate Unit for the Stock Item.

Allow std. rates for stock items

Set this option to Yes, to specify the Standard Purchase Cost and Standard Sales Price of the Stock Item.

Specify default ledger allocation for invoicing

Set this option to Yes, to Set or Modify Default Ledgers for Invoicing for the Stock Item.
This allows you to allocate default Sales/Purchase Ledgers which will be credited when a Stock Item is invoiced.

Allow component list details (Bill of Materials)

Set this option to Yes, to define the Components (BOM) for the Stock Item. For further details, refer to the section Bill of Material.

Use Addresses for Godowns

Set this option to Yes, to enter the godown address in the Godown Master.
read more "F12: Accts / Inventory Info. Configuration in Tally ERP9 "