Sunday, 12 June 2016

Pre-allocate Bills for Payment or Receipt in Tally ERP 9

By enabling this option in F12: Configure, you can pre-allocate the bills before specifying the Ledger amount. This Configuration enables the user to select the bills first before the total amount can be updated in the amount field.
For Example:
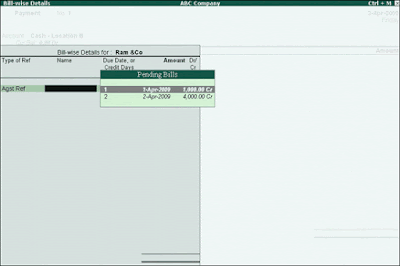
The company pays against the Purchase bills. Here set the option Pre-Allocate Bills for Payment/Receipt as Yes. Now while making the entry immediately after selecting the party the Bill-wise details screen for the party appears.
Here on selecting Agst Ref the List of Pending Bills for the party are displayed.
Note: For the Pending Bills table to be displayed the F12 option Show Table of Bill Details for Selection should be set toYes. If it is set to No then the list of pending bills are not displayed
After selecting the Bills press Enter to obtain the voucher entry screen
In the above screen it can be seen that the Bill-wise details are also appearing in the voucher entry screen.
  • To obtain this Billwise details, the F12:Configure option Show Bill-wise Details should be set to Yes.
  • To obtain the Credit period, the F12:Configure option Expand into multiple lines should be set to Yes.


read more "Pre-allocate Bills for Payment or Receipt in Tally ERP 9"

Warn on Negative Cash Balance in Tally ERP 9

You can configure Tally.ERP 9 to prompt you with a warning when the Cash ledger reaches a negative balance.
To activate Warning on Negative Cash Balance,
Go to Gateway of Tally > Accounting Vouchers
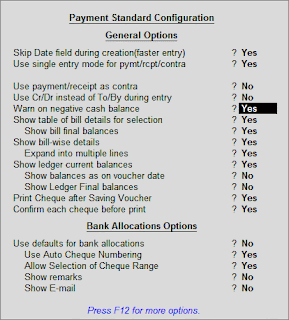
  • Set the option Warn on negative cash balance to Yes in F12: Configure screen.

  • Accept the screen to save.
For Example:
Let us assume there is a cash balance of Rs.25000 and you need to make a payment of Rs.26000 towards Advertising expenses. This results in a negative cash balance.
The Payment entry is displayed as shown:
Tally.ERP 9 prompts you with a negative cash warning message and the credit cash balance in RED Colour. This will help you to decide whether to proceed with the entry or not.

read more "Warn on Negative Cash Balance in Tally ERP 9"

Recording a Payment Entry using Bank in Tally ERP 9

Payment Vouchers can be created using Bank as the mode of payment.
Go to Gateway of Tally > Accounting Vouchers
  • Select F5: Payment from the Button Bar or press F5.
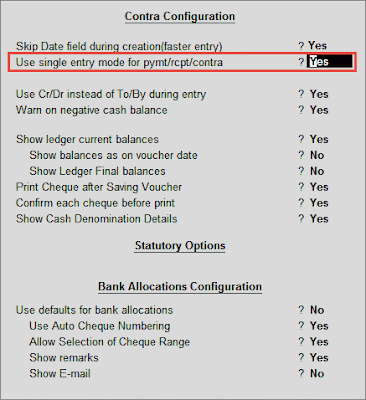
Payment voucher can be passed using Single Entry or Double Entry mode by configuring the setting Use Single Entry mode for Pymt/Rcpt/Contra in F12 configuration.  
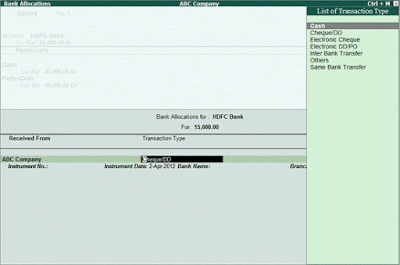
On entering the party details and amount, the bank allocation screen appears as shown below:
The details in the bank allocation screen is captured as defined in the Provide Bank Details in the party master. However these details can be altered as shown below:
The fields that are to be filled vary with the Transaction Type selected.
  • On selecting Inter Bank Transfer, the additional fields that appear are that of A/c No.IFSC CodeBank and Transfer Mode.
  • On selecting Same Bank Transfer, the additional field of A/c No. appears.
The additional field of Beneficiary Code appears on setting the option Allow to Beneficiary Code to Yes in F11: Features > Edit banking features > Banking Features. The field Beneficiary Code appears when the following Transaction Types are selected:
  • Electronic Cheque
  • Electronic DD/PO
  • Inter Bank Transfer
  • Same Bank Transfer
To view the e-mail ID of the party in the bank allocations screen, then in F12:Configure set the option Show E-Mail to Yes
The bank allocations screen with Beneficiary Code and E-mail ID appears as shown below:

Note: When recording a payment voucher using bank for two parties, in the bank allocation screen, the default of both the parties will be captured on setting the option Set Ledger wise Bank Allocation on Create Mode to Yes.


read more "Recording a Payment Entry using Bank in Tally ERP 9"

Recording a Payment Entry with Narration for each Entry in Tally ERP 9

If you want the narration details for every ledger you debit or credit (Single narration), you can configure Tally.ERP's Narration details accordingly.
To activate the option Narration for each entry,
Go to Gateway of Tally > Accounts Information > Voucher Types > Alter
  1. Select the required Voucher Type.
  2. Enable the option Narrations for each Entry and accept the details.
  3. Return to Accounting Vouchers in Gateway of Tally and select the voucher type and pass the entry.
Narration for each entry option is available for all Accounting Voucher Types.  Given below is an example of a Payment transaction with narrations for each entry enabled:
The above entry consists of both common narration and narrations for each entry.  In case of multiple debit/credit entries, you can give single line narration separately for every ledger account selected.

Special Keys for Voucher Narration Field

  • ALT+R: Recalls the Last narration saved for the first ledger in the voucher, irrespective of the voucher type.
  • CTRL+R: Recalls the Last narration saved for a specific voucher type, irrespective of the ledger.
read more "Recording a Payment Entry with Narration for each Entry in Tally ERP 9"

Recording a Payment Entry in Tally ERP 9

Payment Voucher is used to record all bank and cash payments, For example: company settles a creditor's bill by cheque.
To view the Payment Voucher entry screen:
Go to Gateway of Tally > Accounting Vouchers
  • Select F5: Payment from the Button Bar or press F5.
Payment voucher can be passed using Single Entry or Double Entry mode by configuring the setting Use Single Entry mode for Pymt/Rcpt/Contra in F12 configuration.  
For example: the company settles expenses of Conveyance, Staff Welfare, Postage and Stationery through Cash in one voucher. This entry can be passed in single entry mode where you will be crediting the Cash Ledger only once and the entry appears as shown below.

Note: Similarly the transactions can be recorded in single entry mode even in Receipt and Contra vouchers.

Payment entry in Voucher entry mode:

When you have multiple Debits and Credits in an entry, Double Entry mode is the suggested way of passing the entry.


read more "Recording a Payment Entry in Tally ERP 9"

Introduction to Payment Voucher in Tally ERP 9

Payment voucher is used to account all the payments made by the company by way of Cash/Bank. .
Payment voucher can be passed using Single Entry or Double Entry mode by configuring the setting Use Single Entry mode for Pymt/Rcpt/Contra in F12 configuration.  
read more "Introduction to Payment Voucher in Tally ERP 9"

Use Payment or Receipt Voucher as Contra Voucher in Tally ERP 9

The Contra Voucher is used to indicate transfer of funds from
  • Bank account to Cash account
  • Bank account to Bank account
  • Cash account to Bank account.
  • Cash account to Cash account.
When you are passing a Payment voucher, you do not get the Cash and Bank Ledgers for selection in the list of Ledger Accounts on the Debit side and when you are passing a Receipt voucher, you do not get the Cash and Bank Ledgers for selection on the credit side.
However, for users who wish to use the Payment and Receipt vouchers for this nature of transaction, Tally.ERP 9 has the flexibility of defining Payment and Receipt behaviour as per Contra voucher.
Go to Gateway of Tally > Accounting Vouchers
  1. Select F5: Payment from the Button Bar or press F5.
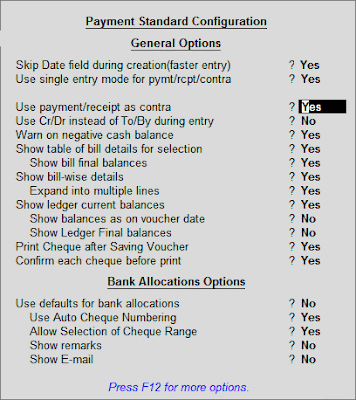
  2. Set the option Use payment/receipt as Contra to Yes in F12: Configuration screen.
  1. Click Accept to save.
Refer to F12: Configuration in Tally.ERP 9 for more details.
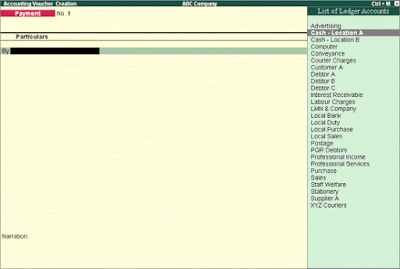
If the option Use Payment as Contra is set to Yes in the F12: Configure screen, the cash and bank accounts will be displayed for selection.

If the option Use Payment as Contra is set to No in the F12: Configure screen, the cash and bank accounts will not be displayed.


read more "Use Payment or Receipt Voucher as Contra Voucher in Tally ERP 9"

Recording Contra Entry in Double Entry Mode in Tally ERP 9

The Contra voucher can be recorded using Double Entry mode where we have the option to select multiple Debits and multiple Credits. To select multiple Debit and Credit ledgers in the Double entry mode, set Use Single Entry Mode for Payment/Receipt/Contra to No in F12: Configure.
Refer to F12: Configuration in Tally.ERP 9 for more details.

Entering in Double Entry Mode

Go to Gateway of Tally > Accounting Vouchers
  • Select F4: Contra from the Button Bar or press F4.
If you record the same entry (passed in single entry mode) in Double Entry Mode, it will be displayed as shown:
Similar to the Contra entry in Single Entry Mode,
In the Bank Allocation screen, users can select the mode of transaction from the List of Transaction Type as shown:
By default, Cheque/DD will be selected.
When Cash is selected as the Transaction Type, a new screen – Cash Denominations
The cash denominations entered here will be captured in the Cash Denomination details while printing a Cash Deposit Slip for this transaction.
The Difference field will give the difference between the total and and the sum of amounts specified for the Denominations.

Note: If the cash is transferred to more than one bank, then for each bank a separate Cash Denominations screen will appear.


read more "Recording Contra Entry in Double Entry Mode in Tally ERP 9"

Recording Contra Entry in Single Entry Mode in Tally.ERP 9

The Contra Voucher can be recorded using Single entry mode or Double Entry mode.  To toggle between Single Entry and Double Entry mode, we need to change the setting Use Single Entry mode for Pymt/Rcpt/Contra to Yes/No in F12: Configure.
To view Contra Voucher creation screen in Single Entry mode:
Go to Gateway of Tally > Accounting Vouchers > Select F4: Contra
For example, to transfer funds from Cash Account to Bank Account:
  1. Debit the Bank Account
  2. Credit the Cash Account
The entry will be displayed as shown.
In the Bank Allocation screen, users can select the mode of transaction from the List of Transaction Type as shown:

By default, Cheque/DD will be selected.
When Cash is selected as a Transaction Type, user can specify the cash denominations for the transaction in the voucher entry screen, if the optionShow Cash Denomination Details set to Yes in F12: Configuration (By default, this option is enabled)
During Bank Allocation, a new screen – Cash Denominations will appear for Cash Transaction Type.


The cash denominations entered here will be captured in the Cash Denomination details while printing a Cash Deposit Slip for this transaction.
The Difference field will give the difference between the total and the sum of amounts specified for the Denominations.

Advantages of Single Entry Mode:

  • Faster data entry.
  • When there is a Single Debit and Multiple Credits in the entry.


read more "Recording Contra Entry in Single Entry Mode in Tally.ERP 9"

Introduction to Contra Voucher in Tally ERP 9

As per the Accounting Principles, a Contra entry is a transaction involving transfer of cash between one Cash A/c to another or one Cash A/c to another Bank A/c i.e., is a transaction indicating transfer of funds from:
  • Cash account to Cash account
  • Cash account to Bank account
  • Bank account to Cash account
  • Bank account to Bank account
To view the Contra Voucher Entry Screen:
Go to Gateway of Tally > Accounting Vouchers
  • Select F4: Contra from the Button Bar or press F4
read more "Introduction to Contra Voucher in Tally ERP 9"

Voucher Entry Creation Screen

The Voucher Entry screen is divided into three parts:  
  • The Main Voucher Entry  
  • Vertical Button Bar
  • Calculator

Voucher Entry Screen components

Main Voucher Entry Area

The Main Voucher Entry Area is where you enter all your transactions. This area has fields for Date, Ledger Name and Amount as well as additional pop-up screens that are dependent on your voucher configuration and the nature of transaction you make.

Button Bar

The Button Bar area displays buttons that provide quick links to various functions and features of Tally.ERP 9. Buttons that are relevant to the current task are enabled and the other buttons are disabled.

Switching between Screen Areas

The Main Voucher Entry Area is the active area by default on the Voucher Creation screen. Press Ctrl+N to navigate to the Calculator Area and press Ctrl+M to toggle back to Main Voucher Entry Area.  A green bar highlights the active area of the screen.

Calculator Area

The Calculator area provides a working space where you can enter any number of mathematical formulae for complex calculations.
Note: Press Alt+C to use calculator when at amount field.

Special Keys for Voucher Narration Field

ALT+R: Recalls the Last narration saved for the first ledger in the voucher, irrespective of the voucher type.
CTRL+R: Recalls the Last narration saved for a specific voucher type, irrespective of the ledger.

Checking the accuracy of the vouchers

To check the accuracy of the vouchers that you have entered:
Go to Gateway of Tally > Display > Day Book
  1. Select F2: Period from Button Bar and enter the period for which you want to view Vouchers.
Note: It defaults to the current date only but you may display all the transactions for a particular period.
Select F1: Detailed
You can check the vouchers for correctness. To correct a mistake, position the cursor on the item where you have found the error and press Enter. Tally.ERP 9 displays the voucher details for alteration. The alteration facility is subject to security and access rights. All alterations are available for audit.
read more "Voucher Entry Creation Screen"

Predefined Vouchers in Tally.ERP 9

Tally comprises of the following predefined Vouchers, to suit different business requirements for recording various transactions. Tally also allows you to create user-defined Vouchers (Voucher Types) as per your requirements.
  • Contra Voucher
  • Payment Voucher
  • Receipt Voucher
  • Journal voucher
  • Sales Voucher / Invoice
  • Debit Note Voucher
  • Credit Note Voucher
  • Purchase Voucher / Invoice
read more "Predefined Vouchers in Tally.ERP 9"